Celebrate the 4th of July with a Refreshing Watermelon Pizza Dessert!
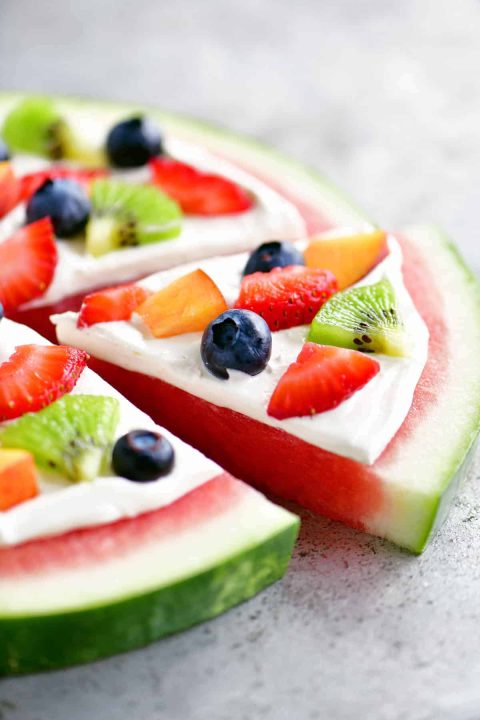
Get ready to add a splash of color and a burst of freshness to your Independence Day gatherings with a delightful Watermelon Pizza Dessert! Watermelon Pizza?! You read that right - this fun and healthy twist on a traditional pizza will have your taste buds dancing with joy. A juicy watermelon base, topped with tangy yogurt “sauce”, and loaded with sweet berries, this patriotic treat is as delicious as it is beautiful. So, let's dive into the recipe and create a vibrant dessert that will steal the show this 4th of July!
Ingredients:
For the Watermelon Pizza:
- 1 large, round slice of seedless watermelon (about 1 inch thick)
- Fresh blueberries
- Fresh raspberries
- Fresh strawberries, sliced
- Fresh mint leaves, for garnish
For the Yogurt Topping:
- 1/2 cup Greek yogurt (you can use vanilla or plain)
- 1 tablespoon honey (adjust to taste)
- 1/2 teaspoon vanilla extract
Instructions:
- Prepare the Watermelon Slice:
- Start by choosing a large, round slice of seedless watermelon. Make sure it's about 1 inch thick to provide a sturdy base for your pizza.
- Place the watermelon slice on a clean cutting board or a serving platter.
- Create the Yogurt Topping:
- In a small bowl, combine the Greek yogurt, honey, and vanilla extract.
- Stir well until the ingredients are thoroughly mixed. Feel free to adjust the sweetness by adding more or less honey to your liking.
- Assemble the Watermelon Pizza:
- Spread the yogurt topping evenly over the watermelon slice, just like you would spread sauce on a pizza crust.
- Arrange fresh blueberries, raspberries, and sliced strawberries on top of the yogurt, creating a beautiful, patriotic pattern.
- For an extra festive touch, sprinkle some fresh mint leaves over the fruit.
- Serve and Enjoy:
- Slice your Watermelon Pizza into individual portions, just like you would with a regular pizza.
- Serve it immediately or refrigerate for a short while to allow the flavors to meld together.
- This refreshing dessert is best enjoyed chilled, making it perfect for those hot summer celebrations.
- Watch as your guests' eyes light up with delight when they see this vibrant, healthy treat.
Tips:
- Feel free to get creative with your fruit toppings! You can use any red and blue fruits you like, such as blackberries, cherries, or even sliced kiwi.
- Add a sprinkle of shredded coconut or a drizzle of melted dark chocolate for extra flavor and texture.
- If you're serving the Watermelon Pizza at a later time, wait to add the yogurt topping and fruits until just before serving to keep the watermelon slice firm.
This 4th of July, elevate your dessert game with this delightful Watermelon Pizza! It's a refreshing and healthy treat that embraces the colors of the American flag. With succulent watermelon, bright berries, and a creamy yogurt topping, this dessert is a showstopper that will impress your guests and satisfy their sweet cravings. Put on your apron, grab that watermelon, and get ready to indulge in a slice of pure summer bliss! Happy Independence Day!
COURSE: Dessert, Snack
CUISINE: American
COOK TIME: 10 minutes
TOTAL TIME: 10 minutes
SERVINGS: 8 Servings
SERVING SIZE: 2 Slices
CALORIES: 64 cal
MACROS: 1g Fat, 15g Carbs, 2g Protein
Originally posted on https://www.eatingwell.com/recipe/254624/watermelon-fruit-pizza/ <3
Celebrate the 4th of July with a Refreshing Watermelon Pizza Dessert! Get ready to add a splash of color and a burst of freshness to your Independence Day gatherings with a delightful Watermelon Pizza Dessert! Watermelon Pizza?! You read that right – this fun and healthy twist on a traditional pizza will have your taste […]

Who says immunity and dessert don't mix!?
Sip, sip, hooray! We've combined the lightly carbonated Orange Burst flavor of IMMUNITYAID Wellness Blend with the slow-melting goodness of your favorite ice cream (or non-dairy substitute) for a Fall Float that will rock your world while helping to actually boost your immune system.

"Echinacea, Zinc, and Ice Cream, oh my!"
Just in time for cooler weather and all the germs it brings with it, IMMUNITYAID offers essentials vitamins and nutrients to keep you running on all four cylinders:
♦ Vitamins A, C & D3 to help you stay defended
♦ Echinacea, Zinc & Astragalus Root to help boost your immune system
♦ Turmeric to help reduce inflammation from everyday stress
♦ Chamomile, Ginger Root & Lemon Balm for calming effects
♦ Absolutely NO artificial flavors, sweeteners, sodium or caffeine
♦ Made with only the good stuff!


♦ 1 can of IMMUNITYAID Wellness Blend, chilled
♦ 1-2 scoops of your favorite ice cream (or non-dairy substitute)

1. Pour the contents of one can of IMMUNITYAID over 1-2 scoops of your favorite ice-cream (or non-dairy substitute) in your favorite tall glass, until desired ratio of liquid to ice cream is reached.
2. Use a spoon and/or straw to sip your way to immunity while enjoying your new favorite Fall treat!

Find out more about IMMUNITYAID Wellness Blend and order a case today at LIFEAIDBevCo.com
Made with only the good stuff!
> > > Live well.
Who says immunity and dessert don’t mix!? Sip, sip, hooray! We’ve combined the lightly carbonated Orange Burst flavor of IMMUNITYAID Wellness Blend with the slow-melting goodness of your favorite ice cream (or non-dairy substitute) for a Fall Float that will rock your world while helping to actually boost your immune system. “Echinacea, Zinc, and Ice […]
Say "goodbye" to the days of feeling stuck between achieving your summer fitness goals and having a cocktail with friends. Now, thanks to the Keto-Rita, you can say "yes" to both! Here's our recipe for a sugar-free summer treat that will change the way you think about staying on track with your macros through all your social engagements this summer.

Meet the Keto-Rita, your perfect macro-friendly summertime libation! Made with FITAID ZERO, it's naturally sugar-free and happily sweetened with Monk Fruit and Stevia. Each can contains only 5 calories, NO sugar, no artificial sweeteners—only the good stuff & essential vitamins and nutrients your body never knew it could get from a cocktail. Looking and feeling your best while having a little fun has never tasted so good!

 (Yields: 1 serving)
• 1-2 ounces of premium Tequila
• ½ ounce of Cointreau
• ½ can of FITAID ZERO
• Squeeze of fresh lime
• Ice (on the rocks/blended)
• Coarse salt (optional)


1. Pour half a can of FITAID ZERO into a large glass.
2. Add desired amount of Tequila, Cointreau, and fresh lime juice.
3. Pour over ice or blend (with additional ice).
4. Serve with a salted rim (optional).
Enjoy!


110 calories per SINGLE-SHOT serving:
17 Carbs, 0 Protein, 0 Fat
• • •
180 calories per DOUBLE-SHOT serving:
29 Carbs, 0 Protein, 0 Fat
 Learn more about the new sugar-free Recovery Blend FITAID ZERO and shop now at LIFEAIDBevCo.com/Zero
 Follow us on Instagram @fitaid and follow our hashtags: #FITAIDZERO #KetoRita


> > > Live well.
Say “goodbye” to the days of feeling stuck between achieving your summer fitness goals and having a cocktail with friends. Now, thanks to the Keto-Rita, you can say “yes” to both! Here’s our recipe for a sugar-free summer treat that will change the way you think about staying on track with your macros through all your […]
By: Karenia Bowman |
Nothing says "cozy winter comfort food" quite like beef stew.
If you know me, you know there's nothing I love more than family gatherings, valid excuses for being extra festive, and healthier takes on our favorite comfort foods. My husband is a comfort food guy through and through, so naturally I eat up every ounce of his unrestrained enthusiasm when I make one of the classics. According to my husband, Hearty Beef Stew is the holy grail of comfort food. When I make him his beloved hearty beef stew, nothing else in the world matters to him except for those deliciously tender chunks of beef, velvety smooth pillows of potato along with the ensemble of stew veggies that melt in your mouth with each and every bite. We can’t forget about that deep, rich, savory sauce … because it’s all about the sauce. I think it’s pretty safe to say that when it comes to feeding a true comfort food connoisseur, saucy beefy things are a BIG DEAL.
You might be asking, “How can I make a healthier version of such a serious classic without sacrificing my lifestyle goals?”
Easily. With a few strategic swaps, you can enjoy comforting favorites like this beef stew. Instead of purchasing the fattier cuts of stew meat, opt for extra lean cuts. You will drastically reduce the fat and calories without sacrificing flavor. My other strategic swap involves thickening the sauce. A lot of stew recipes use white flour as the main thickening agent. I have nothing against white flour, but with gluten intolerance and/or sensitivity on the rise, I always look for convenient alternatives such as cornstarch, which is inexpensive and readily available.
This recipe is all about convenient home cooked comfort food. No endless hours in the kitchen, no huge pile of dirty dishes that will not do themselves, just some minor chopping, mixing and setting the slow cooker. Whether your days and nights are filled with some seasonal festive fun, or you’re heading to the gym for a much needed workout at the end of a busy day, or you simply can’t cook but you have to eat something to stay alive, the slow cooker can and will be your best friend here.
Even though many of us love this time of year, we are often exhausted by the end of each day. Endless parties and gatherings, holiday events and obligations, the struggle to maintain the balance of a healthy lifestyle in the midst of abundant temptation, and the excitement of the season followed by the inevitable burnout, are all very real experiences we may encounter. As the holidays get closer and our days and evenings get busier, coming home to cook a labor intensive meal is the last thing we want to do. It’s okay to make things a little (or a lot) easier on yourself. Plug in your slow cooker with pride, and let it do the work for you … You can even skip the dishes.
All you need to do is pull up a chair and serve yourself up a generous bowl of this hearty, savory stew to soothe your soul, and fill your belly at the end of a long, eventful day.
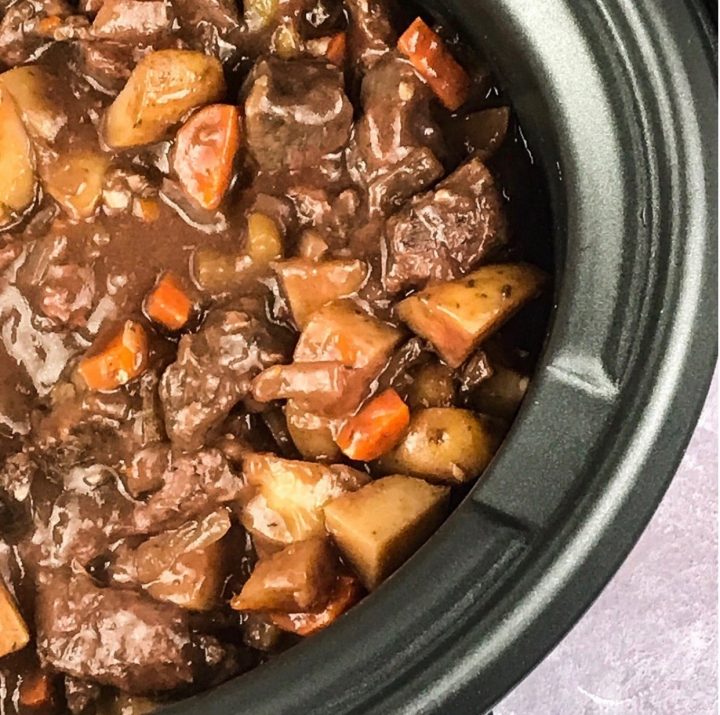
Hearty Slow Cooker Beef Stew
Gluten-free, high-protein, low-fat
Servings: 6 | 282 calories per serving
27g Protein | 28g Carbs | 4g Fat
Ingredients
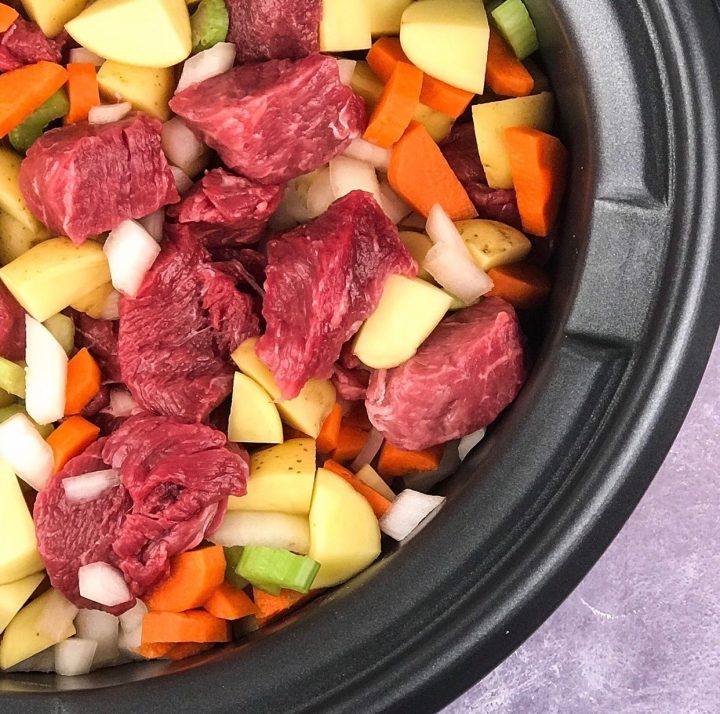
1.5 lb. extra lean stew meat, trimmed and cubed
1 lb. Dutch baby or red potatoes, quartered
1 cup yellow onion, diced
1 cup celery, chopped
1.5 cups carrot, peeled and sliced into rounds
2 garlic cloves, minced
1 cup dry red wine
1 cup reduced sodium beef broth, gluten free
2 Tablespoons tomato paste, whisked in broth
1/4 cup cornstarch, dissolved in 1/4 cup cold water
2 bay leaves
1.5 teaspoons dried thyme
Kosher salt & coarse ground pepper, to taste
Preparation
- Place the trimmed stew meat in the slow cooker. Quarter the baby potatoes, dice the onion, chop the celery, slice the peeled carrots and mince the garlic cloves, then add them to the slow cooker. Pour wine over the meat and vegetable mixture. Whisk the tomato paste in the beef broth until smooth, then pour the mixture into the slow cooker cavity. In a small ramekin, combine 1/4 cup of cold water and cornstarch. Gently stir until the cornstarch has dissolved. Stir the cornstarch mixture into the slow cooker. Add the bay leaves and dried thyme, then season the stew mixture with salt and pepper. Cover the stew with a lid and turn the heat on the low setting, and let cook for 6-8 hours, stirring occasionally.
- When the stew is done, remove the bay leaves. Adjust the salt and pepper to taste preferences and enjoy immediately, or transfer to an airtight storage container and store in the refrigerator for later.
> > > Live well.
By: Karenia Bowman | Nothing says “cozy winter comfort food” quite like beef stew. If you know me, you know there’s nothing I love more than family gatherings, valid excuses for being extra festive, and healthier takes on our favorite comfort foods. My husband is a comfort food guy through and through, so naturally I eat […]
By: Karenia Bowman |
As a chef, I’m highly inspired by all-things food. I love all of the seasonal offerings available toward the end of the year and everything butternut squash is no exception. Even though butternut squash is widely available year-round, it is best known as a winter squash. It’s deliciously soft, sweet and nutty, not to mention easy to prepare, and extremely versatile. One of my favorite seasonal pairings this time of year is butternut squash along with a deliciously savory breakfast sausage.
I know, most people think sausage isn’t conducive to a fit and healthy lifestyle but it can be—dreams really do come true!
With a simple healthy swap of low-fat chicken sausage instead of full-fat pork sausage, you can still indulge without derailing your lifestyle goals or sacrificing flavor. Sometimes I buy my sausage from my local grocer’s butcher department, and sometimes I make my own from scratch (it’s actually easier than you think). Whether your chicken sausage is store-bought or homemade, it’s absolutely delicious when paired with butternut squash. I also love to add a little kale to the mix because it transforms this dynamic duo into a serious triple threat in everything you enjoy them in.
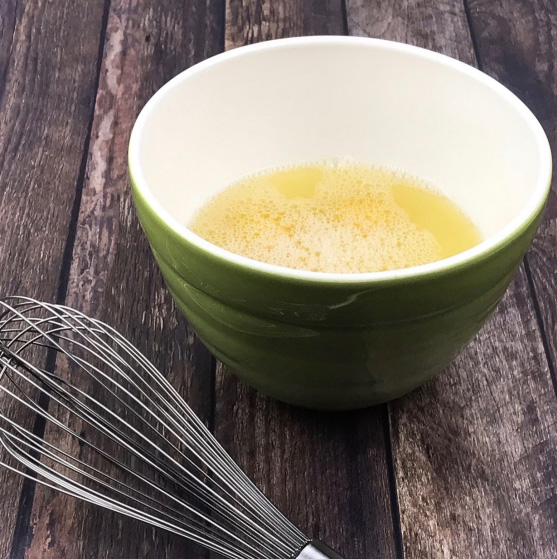
Breakfast is my love language. I have to have it or else I don’t feel whole. I really believe it completes my life. Every morning I cheerfully make my breakfast while sipping an ice-cold protein latte—it’s my ritual … what can I say? More often than not, my morning typically starts with an egg/egg white-based dish. Some mornings, I’ll enjoy my egg muffins on the go, and some mornings I'll opt for a scramble or an omelet of some kind at home. I’ve also been known to savagely chug my egg whites over ice with a morning bowl of oats. At my core, I'm a creature of healthy habits. I start most days with an egg white/egg-based dish because they are high in muscle-building protein, they are deliciously satiating and extremely versatile.
When it comes to mornings, I recognize the fact that most don’t have the time to sit and prepare a full-on breakfast.
If it comes down to hitting the snooze button two to three times, or cooking breakfast ... chances are, most people will opt for the snooze. I’m a firm believer in “having it all," so why not hit the snooze button a few more times and relish the extra sleep while still managing to start your day with a fit, filling, seasonal breakfast on the go? Well, with these deliciously convenient egg muffins, you totally can!

As a chef, my absolute passion is creating balanced solutions for healthier living.
Creating solutions that are actually doable is always my goal, and these savory breakfast egg muffins do not disappoint. Whether you are someone who doesn’t have much experience in the kitchen, or someone who is a seasoned pro, you can easily throw these into your regular breakfast rotation. They require minimal effort and masquerade as convenient protein-packed snacks, ideal for anytime you need a healthy and filling on-the-go snack.
If you have a hectic morning ahead of you, make these little babies the night before. Simply reheat them in the microwave for 15-20 seconds. Voila! You have an instant, homemade high-protein breakfast ready to enjoy before you start your busy day!
R E C I P E
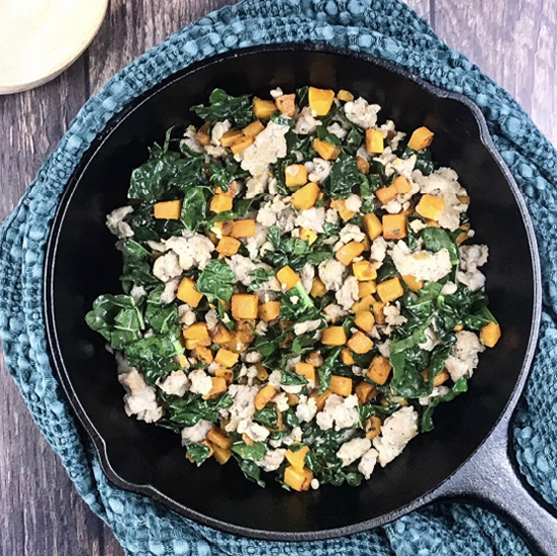
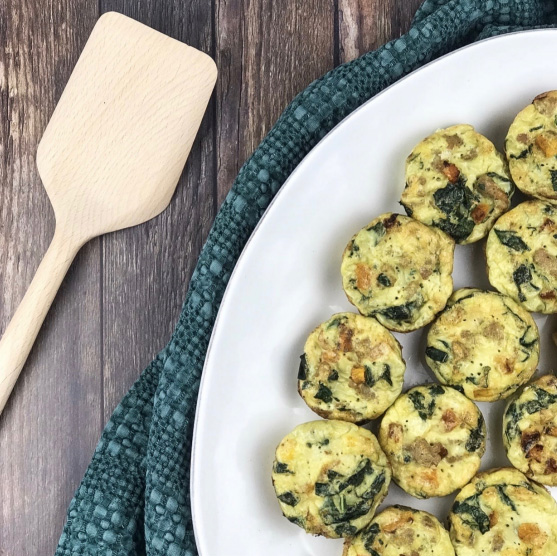
Butternut Squash, Sausage, Kale Egg Muffins
HIGH-PROTEIN | GLUTEN-FREE | LOW-CARB | PALEO FRIENDLY
Servings: 12
60 calories per serving
Macros: 7g Protein | 3g Carbs | 2g Fat
Ingredients
4 oz. low-fat chicken breakfast sausage, casings removed
1.5 cups butternut squash, diced
1.25 cups loosely packed Lacinto kale, chopped
1.5 cups liquid egg whites
4 eggs
1/2 tsp. garlic powder
Coarse ground pepper & Kosher salt, to taste
Preparation
1. Spray a muffin tin with non-stick cooking spray and set aside. Dice butternut squash into small bite-sized pieces and set aside. Chop the kale leaves and set aside, discarding the stems. Heat a large nonstick skillet over low heat. Spray the surface of the skillet with nonstick cooking spray. Transfer the butternut squash cubes and sauté for 7-10 minutes or until tender. When the butternut squash is done, remove the cubes from the skillet and set aside.
2. Wipe down the skillet and spray the surface with non-stick cooking spray. Transfer the low-fat chicken sausage to the skillet. Cook until the meat is no longer pink and begins to brown. While the sausage is cooking, break the pieces into bite-sized crumbles with the corner of the spatula. When the sausage is done cooking, remove the skillet from the heat and transfer the sausage to a colander and drain (optional).
3. Wipe down the skillet and spray the surface of the skillet with nonstick cooking spray. Heat the skillet over low heat. Add butternut squash, sausage and kale to the skillet. Cook until the kale leaves begin to soften and wilt. When done, remove the skillet from the heat and let the mixture cool.
4. In a small mixing bowl, add the eggs and egg whites. Season the egg mixture with granulated garlic, salt & pepper and whisk until well combined.
5. Ladle/pour the egg mixture halfway up into each muffin cavity. When cool enough to handle, disperse the filling evenly among each cavity. Place the muffin tin on top of a sheet pan (larger than the muffin tin). Place the muffins in the oven for 25-30 minutes or until done with no liquid remaining. When done, remove the muffins from the oven and let cool.
6. When the egg muffins have cooled, enjoy immediately or transfer to an air-tight container and store in the refrigerator for later.
> > > Live well!
By: Karenia Bowman | As a chef, I’m highly inspired by all-things food. I love all of the seasonal offerings available toward the end of the year and everything butternut squash is no exception. Even though butternut squash is widely available year-round, it is best known as a winter squash. It’s deliciously soft, sweet and nutty, […]
By: Karenia Bowman |
Salmon is one of my favorite seafood superstars.
It’s an excellent source of protein, jam packed full of healthy Omega-3’s, and really good for the heart. Don’t get me started on the taste! Not only is salmon a quick and healthy option, salmon is an absolutely delicious option as well. This time of year, we have a tendency to embrace the heartier comfort foods we all know and love, but lighter fare can be just as comforting, especially if you embrace all the season has to offer.
Salmon is a great protein option you can enjoy year-round and can easily be customized for your seasonal needs. Whether you are rushing home after running endless holiday errands, or you have dinner guests and are in need of something easy and elegant without being too pretentious, or perhaps you just need a convenient option that gives you that fun seasonal moment while keeping your lifestyle practices fit and flexible, salmon is the jam! One of favorite ways to prepare salmon involves a tried and true two-step process: marinate & broil. With a few simple ingredients like an orange, a drizzle of honey and a few cloves of garlic, you can easily transform a simple fillet of salmon into an unforgettable main dish that will leave your taste buds singing (and your guests raving).
As we all know, the holiday season brings joy, laughter, and festivities galore. Unfortunately, it’s also the season for coughs, colds, sneezes, and sniffles.
Being a health-focused chef, I’m all for wellness support and the healing properties found in foods.
Did you know that you can use easily accessible, affordable, seasonal ingredients that help boost your precious immune system when you become the most vulnerable? Well, you can…and this recipe is a perfect example. I absolutely love oranges. Mandarin oranges, Navel oranges, Blood oranges, and so many more. Oranges are an awesome ingredient when preparing both sweet and savory dishes. Oranges are sweet, juicy and loaded with the immunity supporting, antioxidant protection of Vitamin C. Consuming foods rich in Vitamin C is an easy, convenient (and tasty) approach to the common cold prevention that many of us need this time of year.
Honey (aka: liquid gold!) is a common ingredient I incorporate into many of my dishes, especially marinades. Most of us have a jar or bottle on hand even though it’s delicious healing properties are often overlooked. Honey is a natural cough suppressant, which can be really beneficial this time of year. It has been suggested that by enjoying a teaspoon or two of mother nature’s sweet throat-coating nectar, you can silence a pesky nighttime cough so your restful night’s sleep can resume. For those of you who love a little trivia, the Manuka Honey variety is especially good for us. It is know to help us combat all of the seasonal “sickies” that we often encounter this time of year.
Manuka honey contains anti-inflammatory, anti-bacterial and anti-viral properties.
Last but certainly not least, we have to give some love to garlic. Garlic has and always will be one of my go-to ingredients. On one hand, it elevates the taste of absolutely anything and everything. On the other, it’s just plain good for you. Don’t let the size of a garlic clove fool you. Garlic may be small, but it’s mighty—packing quite the nutritional powered punch! Research suggests that garlic can help combat coughs and colds. Garlic is also known to be a heart-healthy food and can even assist in healthy digestion.
These three immune boosting superfoods are not only delicious on their own, but they make a delicious marinade as well. I love teamwork, and these three all-stars paired with some fresh salmon hit a home run for an immune-boosting, wellness-supporting entree that requires minimal time and effort.
R E C I P E
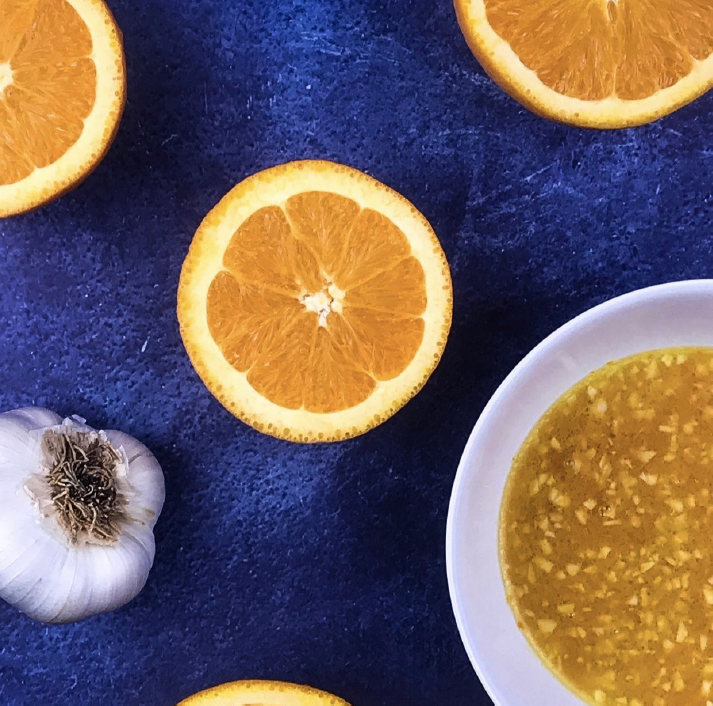
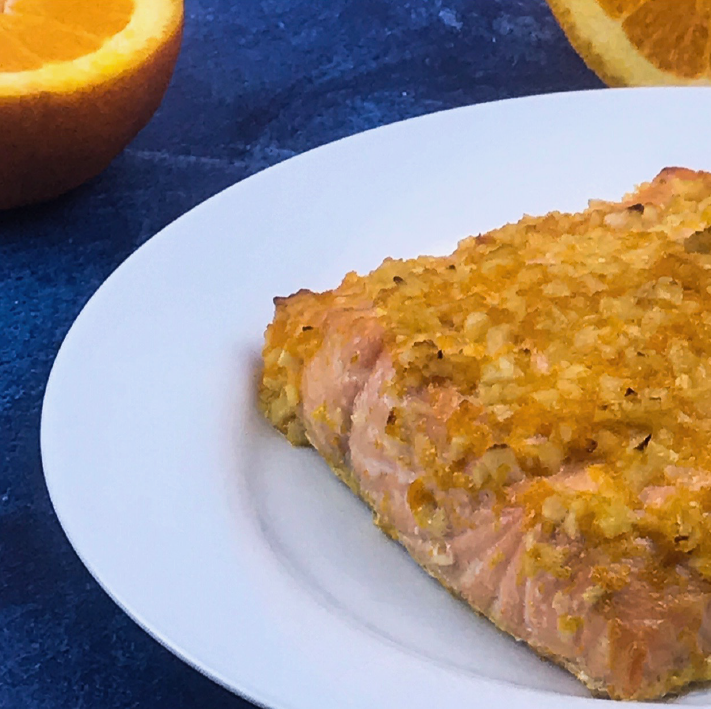
Sweet Garlic Citrus Marinated Salmon
GLUTEN-FREE | HIGH-PROTEIN | LOW-FAT | LOW-CARB | PALEO
Servings: 4
318 calories per serving
Macros: 32g Protein | 8g Carbs | 16g Fat
Ingredients
1 lb. Atlantic Salmon fillet
zest from 1 whole orange
1/2 cup orange juice, fresh-squeezed
2-3 garlic cloves, minced
1 Tbl. honey
2 tsp. olive oil
1/4 tsp. Kosher salt
Preparation
1. Preheat the broiler. Line a sheet pan with foil and set aside. Mince the garlic cloves and add
them to the mixing bowl. Grate the orange peel and transfer the zest to the mixing bowl.
Squeeze the orange and add the juice to the mixing bowl. Add the remaining marinade
ingredients to the bowl and whisk until well combined.
2. Place the salmon fillet in a large resealable bag. Pour the marinade into the resealable bag
over the salmon, remove any air, and seal the bag. Place the salmon in the refrigerator for a
minimum of one hour, flipping once halfway through.
3. Remove the fillet from the resealable bag and place it on the sheet pan. Pour the remaining
marinade over the salmon fillet. Place the sheet pan in the broiler for 8-10 minutes, or until
the salmon begins to flake and/or the preferred level of done-ness is achieved. When the
salmon is done broiling, remove the sheet pan from the oven and let the salmon rest for 10
minutes. After the salmon has rested, enjoy immediately or transfer to an airtight container
and store in the refrigerator for later.
> > > Live well!
By: Karenia Bowman | Salmon is one of my favorite seafood superstars. It’s an excellent source of protein, jam packed full of healthy Omega-3’s, and really good for the heart. Don’t get me started on the taste! Not only is salmon a quick and healthy option, salmon is an absolutely delicious option as well. This time […]