Recovery Meal | Tofu Parmesan Vegan

What’s for dinner? How about…

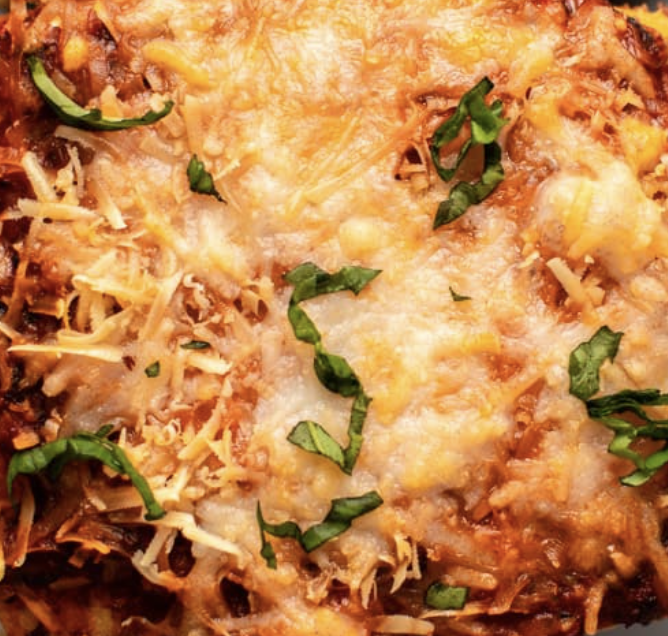
Vegan Tofu Parmesan!

We have someone on our sales team, who shall not be named, who will ONLY order “Chicken Parm” if he eats out at a restaurant. We are challenging him to change it up and give this Vegan Tofu Parmesan Recovery Meal recipe a try for his next make-at-home meal! Best enjoyed with an ice-cold FITAID. Let us know on social @FITAID how it turned out! Post a photo and tag us to be shared on our stories! Enjoy!

Ingredients: (serves 2x people)

  • 34 ounce extra firm or super-firm tofu cut into 4 thin pieces*
  • 4 cups low-sodium vegan chicken broth
  • 0.5 cup all-purpose flour
  • 2 teaspoon Italian seasoning optional
  • 1 teaspoon salt
  • Black pepper to taste
  • 2 tablespoon cornstarch
  • 1.5 cup panko breadcrumbs*
  • 0.671 cup olive oil
  • 2 cup marinara sauce
  • 1 cup vegan mozzarella cheese
  • 1 cup shredded vegan Parmesan
  • 0.5 cup chopped fresh basil and/or parsley for serving


Instructions (short):

  1. Marinate the tofu “cutlets” for at least 30 minutes, preferably overnight.
  2. The next day, prep the 3-step breading ingredients.
  3. Dredge both sides of the tofu in the flour, “egg” wash, and breadcrumbs.
  4. Pan fry the tofu in a hot skillet on each side for 4 to 5 minutes, or until golden brown. Transfer the tofu to a paper towel lined plate to absorb any excess oil.
  5. Place the tofu in a baking dish and top each “cutlet” with marinara sauce, vegan mozzarella cheese, and vegan parmesan cheese.
  6. Bake on the middle rack for 15 to 20 minutes, or until melted and bubbly.
  7. Serve warm with fresh herbs.


Instructions (long):

    • Marinate: Slice tofu and soak in liquid covered for at least 30 min, or overnight for stronger flavor. Remove the tofu from the marinade and place on a plate; reserve 1/3 cup of the marinade, and discard the rest.
    • Prep: Preheat the oven to 450F and grease or line a baking sheet. Then, prepare the three-step breading process:
    • Flour: Place the flour, Italian seasoning (if using), salt, and pepper on a shallow plate. Mix well.
    • “Egg” Wash: Whisk the reserved 1/3 cup (80 ml) of the tofu marinade with the cornstarch in a shallow bowl or plate with a lip.
    • Breading: Place the breadcrumbs on a shallow plate.
    • Prepare the Tofu: dredge both sides of the tofu in the flour mixture first, then briefly in the “egg” mixture, then into the breadcrumbs until evenly coated. Set aside and repeat with the remaining pieces of tofu
    • Pan-Fry: Warm the oil in a large skillet or sauté pan over medium heat. Add the breaded tofu to the oil and fry for 4 to 5 minutes on each side, or until golden brown. Transfer the tofu to a plate lined with a paper towel briefly, to absorb the excess oil.
    • Bake: Transfer the tofu cutlets to the prepared baking tray and top each cutlet with 1/4 cup (60 ml) of sauce, 2 tablespoons of mozzarella cheese, and 1 tablespoon of vegan Parmesan. Bake in the middle rack of the oven for 15 to 20 minutes, or until the cheese is melted and bubbly.
    • Serve: Transfer to serving plates and top with fresh herbs. Serve warm; leftovers will keep in the fridge for up to 3 days and are best reheated in the oven, toaster oven, or air fryer.


Substitutions and Variations for this Vegan Tofu Parmesan Recovery Recipe

  • Gluten-Free option: Use a gluten-free 1:1 flour blend and gluten-free panko breadcrumbs.
  • Low oil option: In order to get a nice golden crust on the tofu breading, you do need to use at least a small amount of oil. If you’d like to lower the amount of oil you need, use a nonstick ceramic pan and lightly spray the tofu cutlets with cooking spray to give them color.
  • Baked variation: Prepare the tofu cutlets as written, then spray both sides generously with spray oil. Place the cutlets on a prepared baking sheet and bake plain for 15-17 minutes before removing from the oven, flipping, topping with sauce, and returning to the oven to bake for an additional 15-20 minutes, or until the cheese is melted. You can also make this recipe in the air-fryer with similar “bake” times, but may need to reduce the cook time by 3-5 minutes per side.
  • Tofu alternative: If desired, make this tofu parmesan using a vegan chicken cutlet like Gardein’s Chik’n Scallopini. If you go this route, you do not need to marinate the faux meat.


Additional things to note:

How to reheat Vegan Tofu Parmesan:

To reheat in the oven, bake for 10 minutes at 350F or until warmed through and slightly crispy again. Reheating in the toaster oven or air fryer should be similar in timing.

Can I freeze Tofu?

NO. Freezing this tofu parmesan is not recommended. Not only would this make the breaded tofu soggy, but would also change the texture of the tofu.

Originally posted on https://frommybowl.com/vegan-tofu-parmesan/


Recovery Meal | Fried Rice without the Rice

What’s for dinner? How about…

Cauliflower Fried Rice

Looking for the fried rice without the rice?

Try this Cauliflower Fried Rice recipe!

This 10-minute recipe is easy to make, gluten-free, dairy-free, vegetarian, and great for the entire family. Oh and want to learn more about the difference between Coconut Aminos and Soy Sauce? Read more HERE.

Ingredients

  • 12 oz. bag cauliflower rice (frozen)
  • 4 cups stir fry veggies (frozen)
  • 2 Tbsp sesame oil
  • 1 Tbsp onion flakes
  • 1 tsp garlic powder
  • 1/2 tsp crushed red pepper
  • 2 large eggs
  • 1/4 cup tamari or soy sauce
  • salt/pepper to taste

Instructions

  • Pour 1 Tbsp sesame oil into a skillet over medium heat.
  • Add the cauliflower rice and vegetables, cooking until fully thawed.
  • Cover and continue to cook until the veggies are soft, stirring occasionally.
  • Add the remaining sesame oil, onion flakes, garlic powder, and crushed red pepper.
  • Stir fry everything together.
  • Make a “well” or hole in the middle of the pan.
  • Add in both eggs and scramble.
  • Once the eggs are scrambled, mix into the cauliflower rice mixture.
  • Pour coconut amino or soy sauce over everything, serve, and crack open an ice-cold FITAID and enjoy!

COURSE: Dinner, Side Dish
CUISINE: Asian
COOK TIME: 10 minutes
TOTAL TIME: 10 minutes
SERVINGS: Servings
CALORIES: 147 kcal


Originally posted on https://www.jaroflemons.com/the-best-cauliflower-fried-rice/ <3

Recovery Meal | Keto Banana Bread

Originally Posted on https://healthyrecipesblogs.com/paleo-banana-bread/

What’s for dinner? How about this…

Keto Banana Bread Recipe?

Ok, well it is not exactly a “meal” – unless you eat the entire loaf. And don’t worry, we won’t judge you if you do!

INGREDIENTS

  • Cooking spray for the pan (such as avocado oil spray)
  • 3 large eggs
  • 3 large very ripe bananas well mashed (1.5 cups)
  • 1 tablespoon vanilla extract
  • 2 tablespoons honey
  • 2 cups blanched finely ground almond flour (8 oz)
  • 1 tablespoon ground cinnamon
  • ¼ teaspoon kosher salt
  • 1 teaspoon baking soda

INSTRUCTIONS

  • Preheat your oven to 350°F. Line a small loaf pan (8.5 X 4.5 inches) with parchment paper strips, leaving an overhang on each side of the pan. Lightly spray the lined pan with oil.
  • In a medium bowl, whisk together the eggs, mashed bananas, vanilla, and sweetener.
  • Gradually whisk in the almond flour, cinnamon, kosher salt, and finally the baking soda. Whisk until smooth.
  • Using a rubber spatula, transfer the batter to the prepared pan. Gently tap the pan on the countertop to evenly distribute the batter.
  • Bake the banana bread until browned and set, and a toothpick inserted in its center comes out dry, 40-50 minutes.
  • Using the excess parchment paper as handles, carefully remove the banana bread from the pan and transfer it to a wire rack. Carefully remove the parchment, to allow air to circulate.
  • Cool the bread completely on the cooling rack for about 2 hours. Slice it into 12 slices and serve.

LEFTOVERS

Once the bread is completely cool, slice it. Then place the slices in an airtight container, separating layers with wax paper. You can keep them this way in the fridge for up to 4 days.

You can also freeze the slices in freezer bags. Again, if layering, separate the layers with wax paper.


And don’t forget your ice-cold FITAID to wash it down! 


Recovery Meal | Salmon Patties

Originally posted at https://insanelygoodrecipes.com/air-fryer-salmon-patties/

What’s for dinner? How about…

Salmon Patties!

These air fryer salmon patties are a healthy alternative to regular beef burgers!

Some call them salmon patties, to others, they’re croquettes. No matter what you call them, give this recipe a shot and let us know how it goes.

Air Fryer Salmon Patties

Salmon patties are golden and crispy on the outside, soft and flaky on the inside, and delicious in every bite.

They’re nutritious, to boot! Salmon is rich in Omega-3 fatty acids and antioxidants. Read more about why FITAID has Omega-3s HERE Frying it in oil adds so many calories, though. The solution? Use the air fryer. You’ll still get that crunchy outer crust, but without all that oil. It’s a win-win!

INGREDIENTS

  • Aioli Dipping Sauce
  • 1/2 cup mayonnaise
  • 1 teaspoon garlic, finely minced
  • 1/2 teaspoon fresh lemon juice
  • 2 pinches of Cajun seasoning

  • Salmon Patties
  • 12 ounces salmon, minced
  • 1 tablespoon fresh chives, chopped
  • 1 teaspoon dried parsley
  • 1 teaspoon garlic, finely minced
  • 1/2 teaspoon salt
  • 1 tablespoon all-purpose flour, more if needed
  • 1 lemon
  • Cooking spray

Right to the recipe:

  • This recipe calls for fresh minced salmon, but you can also use canned or previously cooked salmon instead.
  • Use two forks to break the salmon into flakes.
  • Mix in a tablespoon of flour to bind the ingredients. Add more if needed.
  • Divide the mixture into four and shape them into patties.
  • Preheat your air fryer to 350 degrees Fahrenheit. Slice the lemon into four wedges, and place them at the bottom of the air fryer basket.
  • Place the patties on top of the lemon wedges. Aside from the flavor, this will prevent them from sticking to the bottom of the basket.
  • Spray the tops with oil – this gives the patties extra crunch. Stick to olive, avocado, or canola oil spray because they have a high smoke point.
  • Pro-tip: do not use an aerosol oil spray, as it contains harmful chemicals that will damage your air fryer over time.
  • Attach the basket into the air fryer and reduce the heat to 275 degrees Fahrenheit.
  • Cook the patties for 10 to 15 minutes. Flip them over halfway through to ensure even cooking.
  • Spray the tops with oil. This will ensure that both sides are nice and crispy.
  • To test for doneness, insert a meat thermometer into the center of a patty.
  • It should read at least 145 degrees Fahrenheit. They should be golden brown and crisp at this point.


Recovery Meal | THE BEST CAULIFLOWER MAC AND CHEESE EVER

Originally posted on https://kathrynskitchenblog.com/the-best-cauliflower-mac-and-cheese/

What’s for dinner tonight? How about…

The absolute best Cauliflower Mac & Cheese – EVER

This low carb side dish is on repeat at our house- we just can’t get enough. I love how cauliflower is a versatile vegetable and can be used in numerous recipes. Cauliflower recipes have been trending for years since they’re low carb, nutritious, and basically serve as a blank slate for flavor.

What you need:

  • Cauliflower – One large head of cauliflower or two small heads. Fresh cauliflower is much better than frozen cauliflower rice for this keto cauliflower mac.
  • Olive oil – You could really use any neutral oil that you have on hand.
  • Salt + black pepper – One of the best parts of this recipe is the simplicity! It only requires minimal kitchen staple seasonings.
  • Garlic powder – Or not. If you’re a huge fan of garlic, you could certainly replace this with fresh minced garlic for a stronger flavor.
  • Onion powder – Onion powder can also be increased or decreased based on personal preference.
  • Heavy whipping cream – Helps add to the creaminess of your low carb cauliflower mac. You could also use milk if you prefer, it may change the consitency a bit. Sometimes I’ll use both and divide them in the recipe.
  • Cream cheese – If you’re trying to keep this cheesy cauliflower recipe on the healthier side, I would use a low fat cream cheese.
  • Cheese – Try a combination of Cheddar, Monterey Jack and Gruyere cheese, but feel free to choose whichever cheeses you prefer. It is also a great way to clean out the odds and ends in the fridge.


CAULIFLOWER
Cutting the cauliflower into smaller uniform pieces will ensure they all cook at the same rate. I also love a few crispy pieces so I cut some into even smaller pieces. You can cut your cauliflower into bigger pieces if you prefer but you will have to roast them for a little longer or settle for a snap in the middle.
Simply place the cauliflower pieces in an even layer on a baking dish lined with parchment paper or foil. Drizzle with olive oil, salt and pepper and roast cauliflower for 15-20 minutes.
Optional:If you are a lover of that char, like me, you can opt to switch it over to broil for a quick blitz of heat. Make sure to keep a watchful eye to prevent burning- especially if you used parchment paper.


CHEESE SAUCE

After you’ve achieved tender cauliflower, it’s time to make the gooey sauce. This is my favorite part! Use your favorite cheese combinations as long as it equals 2 1/2 cups total. This cheese sauce is straightforward to make.

    1. Whisk together the cream and cream cheese (make sure to cut into pieces so it melts faster) in a saucepan until combined.
    2. Add in the rest of the ingredients and vigorously whisk until combined and cheese is smooth. Once the sauce is melted, remove from the heat immediately. It is important to keep an eye because you don’t want to over cook it otherwise it will turn into a solid. All stovetops vary so this cheese sauce may cook a little quicker or slower depending on your stove.
    3. The last step is to combine it all together! Combine the cream sauce with the cauliflower pieces until they are well coated.

STORAGE & LEFTOVERS

Store leftovers in an airtight container for up to 5 days.

To reheat, simply reheat in the microwave or even warm it up in the oven. If it seems a little dry, you could always add a splash of milk. You can also do this in a small saucepan over low heat on the stovetop.

Recovery Meal | Chicken Fajita Burrito Bowl

Originally posted on Cafe Delites https://cafedelites.com/chicken-burrito-bowl/

What’s for dinner tonight? How about a…

Chicken Fajita Burrito Bowl

This fajita chicken burrito bowl is packed with juicy golden chicken, cilantro lime rice, avocado and a delicious dressing! perfect for meal prep!

Healthy, filling and a good-for-you Burrito Bowl comes together in minutes! Full of fresh ingredients and incredible flavor thanks to your favorite dressing, these burrito bowls are the perfect example of a healthy, hearty meal without sacrificing your taste buds.

INGREDIENTS

The Chicken And Peppers:
2 tablespoons fresh squeezed lime juice

1 tablespoon oil
1 large clove garlic, minced
1/2-1 teaspoon ground chili, (adjust to your desired spice preference)
1 teaspoon each ground cumin and salt
1 tablespoon fresh chopped cilantro, (optional)
4 large chicken thighs, skinless and boneless (1 pound or 500 grams)
2 large bell peppers (or capsicums), cut into strips (I use green, red and yellow)
For The Rice:
1/2 cup long grain white rice, (or Jasmine)
1 cup chicken stock (or broth)
1 clove garlic, minced
1-2 tablespoons lime juice, (juice of 1 lime)
2-3 tablespoons finely chopped cilantro, (or parsley) — adjust to your taste

Burrito Bowl:
5 cups Romaine lettuce leaves (or Cos) washed and strained dry

7 ounces (200 g) can black beans, washed and drained
7 ounces (200 g) corn
1/2 a red onion, chopped
1 avocado peeled, seeded and sliced
Dressing:
2 tablespoons olive oil
3 tablespoons freshly squeezed lime juice
1 tablespoon finely chopped cilantro, (or parsley) — adjust to your taste
1 cloves garlic, crushed
1/2 teaspoon brown sugar
1/4 teaspoon ground Cumin
1/2 teaspoon salt
1/2-1 teaspoon red chili flakes (optional)

INSTRUCTIONS
For Chicken:
In a large shallow bowl, combine lime juice, oil, garlic, cumin, salt, chili and cilantro; mix together. Add the chicken thighs and If time allows, let marinate for 30 minutes.

Heat a large skillet or pan (12-inch | 30cm) on medium-high heat until smoking. Add a drizzle of olive oil to lightly coat the bottom of the pan. Sear the chicken on both sides until golden, charred and cooked right through (about 8 minutes per side, depending on the thickness of your fillets). Flip them a couple of times while cooking so they get a nice even char.
Transfer chicken to a warm plate, loosely tent with foil and let rest.
Add the peppers to the skillet (drizzle with a little extra oil only if needed), and cook until soft and slightly charred. Season with salt and pepper.

For Rice:
While the chicken is marinading or cooking, cook rice: Combine together the rice, chicken stock (or broth), and garlic in a pot over high heat. Mix well and bring to a boil. Reduce heat and cover with a lid until the rice is cooked through.
Fluff up rice with a fork and mix through lime juice and cilantro. Season to taste with salt and pepper, if needed.

Dressing:
Whisk dressing ingredients together to combine.

Assembly:
Combine lettuce, beans, corn, onion and peppers into 4 bowls. Slice chicken into strips and arrange into bowls. Top each with avocado slices and drizzle with dressing.

NUTRITION
Calories: 441kcal | Carbohydrates: 47g | Protein: 12g | Fat: 17g | Saturated Fat: 2g | Cholesterol: 2mg | Sodium: 468mg | Potassium: 248mg | Fiber: 12g | Sugar: 8g | Vitamin A: 7975IU | Vitamin C: 122mg | Calcium: 51mg | Iron: 2.9mg

what goes in a burrito bowl?

A good burrito bowl can really contain anything you like. Don’t let the long ingredients list daunt you! Just imagine all of the flavour in one bowl.

For this recipe, we used

  • Cilantro lime rice — or cauliflower rice. You could also use quinoa, brown rice or minute rice.
  • Black beans — substitute with red beans, chick peas, or refried beans
  • Corn — fresh, canned or frozen
  • Red onion — or green onion slices
  • Red and yellow pepper (capsicum) strips
  • Avocado slices
  • Chicken

chicken fajita flavour

Taking a note from the Best Chicken Fajitas, we used that recipe as a base to make these burrito bowls! The marinade is so incredible, you don’t need to marinate the chicken for long at all! 5 minutes or overnight, customise it to your specific needs, then sear or grill chicken until beautifully charred on the outer edges, while juicy and tender on the inside.

burrito bowl meal prep

Prefer to meal prep instead of serving your burrito bowl as a main meal? No problem!

  1. Have all of your fresh ingredients divided into 4-6 containers.
  2. Cook your chicken, peppers and rice — allow to cool and divide into containers.
  3. Prepare your dressing and pour into smaller salad dressing containers to avoid your burrito bowl going soggy.
  4. Save your avocado until ready to serve.

Recovery Meal | Cauliflower and Kale Frittata

Originally posted : https://www.eatingwell.com/recipe/252877/cauliflower-kale-frittata/

What’s for dinner? How about this…

Cauliflower & Kale Frittata!

Inspired by traditional Spanish tortillas made with potatoes, this healthy frittata recipe swaps potatoes for low-carb cauliflower. Serve it along with kale (or your favorite greens) for brunch or an easy breakfast-for-dinner.

Ingredients

Ingredient Checklist

Directions

Instructions Checklist
  • Position a rack in upper third of oven; preheat broiler to high.

  • Heat 1 tablespoon oil in a large cast-iron skillet over medium heat. Add onion and cook, stirring occasionally, until starting to brown, 2 to 4 minutes. Add cauliflower and water. Cover and cook until just tender, about 6 minutes. Add kale, garlic, thyme and 1/4 teaspoon each salt and pepper; cook, stirring often, until the kale is wilted, 2 to 3 minutes.

  • Whisk eggs, paprika and the remaining 1/4 teaspoon salt and pepper in a large bowl. Add the vegetables to the egg mixture; gently stir to combine. Wipe the pan clean; add the remaining 1 tablespoon oil and heat over medium heat. Pour in the egg mixture and top with cheese. Cover and cook until the edges are set and the bottom is brown, 4 to 5 minutes.

  • Transfer the pan to the oven and broil until the top of the frittata is just cooked, 2 to 3 minutes.

Nutrition Facts

1/4 frittata

293 calories; protein 17.9g; carbohydrates 7.9g; dietary fiber 2.3g; sugars 2.7g; fat 21.1g; saturated fat 7.1g; cholesterol 383.2mg; vitamin a iu 2898.8IU; vitamin c 52.1mg; folate 109.7mcg; calcium 151.5mg; iron 2.7mg; magnesium 37.3mg; potassium 464.9mg; sodium 517mg; thiamin 0.1mg.